Tuesday, July 28, 2015

Homemade Cold Brew Coffee ~ Using Household Items UPDATE

A brief history of my interactions with coffee: the acid hurts my belly >__>

The End.

Espresso: ouch
Fresh ground coffee: ouch
Keurig Coffee: super ouch (and icky)
Wawa Coffee: super super ouchies
Cold Brew: lalala!!! *stars in eyes I love you forever you're gorgeous*

But.

Cold brew is the new fad among coffee drinkers, so obviously it's going to be quite expensive. I usually pick up a bottle or two of Stumptown Cold Brew, and it runs me approximately $3 something a 12 ounce bottle. Ouch, again.

What's so awesome about cold brew?? Well! Due to the way in which it is...brewed...the acid level is low and bloating post-consumption is zilch! It's a coffee fiends dream of dreams! The perfect drink-all-day-everyday concoction o' happiness!

So! I decided to look up some methods of brewing on the Internets and recreate my own version with instruments I have laying around the old homestead!

Instruments (NOTE: I mistakenly put 6 ounces of water in the original post instead of 6 cups water)
Large 24 ounce+ container with a lid
fine strainer - so that the coffee grounds stay, but the liquid does not :D
Coffee filter
6 ounces of rough ground coffee - like the good stuff
6 cups of filtered water
rubberband
Larger, pourable container (for after the coffee is all done and ready to sit your fridge and be consumed at your discretion)

1.  Combine water and coffee. Place in 'fridge for 12 hours (or 18 if you like it super strong like me!)
2. Take out of 'fridge and pour through fine strainer into another container (I used my blender because it was sitting around all lonely-like)
3. Using the original container with which the coffee/water concoction was first kept (though you may want to rinse it a bit), place a coffee filter over the opening and secure with a rubber band
4. Slowly pour liquid through the filter
5. Once completely strained, pour remaining liquid into serving bottle of choice. I recommend something 24 ounces or larger

6. Refrigerate and enjoy! Personally, I mix with unsweetened almond milk - but do what you will!
Low-acid goodness right tharrrr !

Other than that, my husband and I are attending the Refused and Faith No More show in Philadelphia, taking away all toys/furniture/items our toddler decides to smack out of anger, and I'm embracing permanently wearing this Cat with Glasses T forever and ever:
photo by the ever-talented and blurry Photo Booth option on Mac

Friday, June 12, 2015

Easy Spinach and Hummus Pinwheels with Feta ~ Toddler Friendly

This week I learned a few new things about my toddler daughter:

1. At her 15 mo appointment (though she is almost 16 mos now), her head has grown into the 95th percentile while her height has plummeted to the 28th percentile (from 67th in February), and her weight remains in the high-60s percentile - so my assessment of this information is that my daughter is a small, walking rectangle with a large noggin'

2. Mirabelle only acknowledges what I'm saying when it doesn't conflict with what she wishes to do

3. Standing on her chair is only of interest when mommy isn't looking

4. Mirabelle and I are both similar in regards to our easily heightened temper with minimal external influence

5. Pigs sounds like "kuh-kuh", clocks sound like "tick tock, tick tock, tick tock *infinity*", dogs sounds like "urh, urh", cows sounds like "*very dramatic pursing of lips* MOOOOOOO", and cats sounds like "keh keh"

6. Mirabelle is never too full for coconut ice cream or fruit, she is only too full to finish her vegetables

7. 16 month old babies are very strong. It takes skill and strength to extract anything from their tightly wrapped little claws

8. When asked to show you her ears, she will first poke you in the eye and then happily point at her ears. This is because first and foremost she is rude.

9. On the other hand, Mirabelle is very loving and adores giving kisses...mainly to inanimate objects, but kisses nonetheless

10. Bugs amaze her, and I'm trying to not allow my distaste for the 6-10 legged creatures to influence her child wonderment, because that lasts so briefly

So! Now on to the easy peasy weeknight recipe that can be completed in less than 45 minutes with or without a whiny baby tugging at your leg, climbing on chairs, throwing books around the room, stepping on the cat's tail, and sliding your very nice decorative pillow across the floor (sorta like how a mop would clean said floor) ~ yes, that easy.

Recipe Deets

1 sheet thawed puff pastry
3 cups spinach
2 ounces feta cheese (half of the standard 4 ounce container you find anywhere)
1/2 cup hummus of choice (I used roasted garlic)
1/2 diced white onion
1 clove of minced garlic
salt to taste
Greased muffin tin

Preheat oven to 400°

- In a small pan sautee onion, garlic, and spinach (add a pinch of sea salt) until wilted - set aside when done
- Roll out one piece of puff pastry
- Spread hummus evenly (leave a bit of space on each side)
- Transfer spinach and place on top of hummus
- Sprinkle with feta (leave a bit extra for when we top of the pinwheels)
- Semi-tightly roll the pastry and brush with a bit of oil
- Cut into 8 pieces
- Sprinkle some feta on top
- On each pinwheel take the loose piece of pastry and fold it under one side of the pinwheel (this will be the bottom for when you place it in the muffin tin)
- Place the pinwheels in the muffin tin and bake for 25 minutes

Voila! A little Greek inspired, hassle-free, toddler-approved dinner!

Wednesday, June 3, 2015

RawTill4 ~ 2 Months + Toddler Din Successes

Happy 2 (dos, deux, zwei, liang <---thank you lady I work with...etc.) Months RawTill4!! Though...shit feels longer, just saying    >_>

Either way, I started this journey the beginning of April as a week long experiment to see how my body would adjust to a drastic change regarding how I consume food. At the time I was drinking at least two coffees a day (acid make me no happy), salads for breakfast/lunch + balsamic vinegar + steamed vegetables, salty snacks up the...up the...the you know...up and stuffs...pretty much my waking moments were composed of thinking about what I wanted to eat while simultaneously counting calories and doing crash diets in order to consume said calories. It was sort of sad actually! I was eating healthy by society's standards but my body was telling me this wasn't working, I was burying myself in a world of packaged goods in the form of salad dressing, coffee creamer, salty snacks, and well, that's about it...but that's all it took for this post-baby making metabolism!

So! After one week on RawTill4 I realized I generally felt better, my portions were back in control, and I no longer craved ridiculous amounts of salt. It just felt...good.

Buzzzzz. Beeeeeep. 2 months have passed. Hi, hey! I've finally semi-accepted my weight/physique sorta/kinda. I've lost a couple of inches and I feel great in regards to energy most of the time (B12 vitamins in use!), so summer is approaching and I dug out the 2-piece for a spin. Felt good. It's odd, how the female brain operates. My husband is my biggest supporter. He met me almost 6 years ago when I was at my heaviest (5'2; 135-140 lbs) and he loved every part of me but it didn't matter. Along  with my own self-deprication, I heard opinions from outside sources stating things like "she will become a marshmallow" or "Rick likes them big" ...haha...as I can look back and laugh, a few statements like those can really hurt, whether or not we like to admit it. And due to the fact that I had struggled with weight paranoia issues for quite some time, these opinions only fueled my general distaste in my physical form. Currently, I'm still 5'2 (yea, apparently vertical growth past 8th grade was not in the books) and remain between 115-118 lbs, but the difference can be found in the lack of bloat. While I'd love to lose another 5-10 lbs, I'm content feeling as though I'm doing everything dietary that I can possibly do. And that is a first for me.

Below are examples throughout my 2 month RawTill4 (carbs at night) food-related experiments
Besides shoving whole food items into my face, I've tried to broaden my toddler daughter's pallet with vegetarian post-work tired brain meal ideas:
What I've learned:

1. Children enjoy any vegetables that are roasted. Any.
2. Children will consume cheese regardless if dairy resides within it.
3. Children consume fruit morning, day, and night because it's sugar and sugar tastes good.
4. Make "mashed" anything and small humans will eat it.
5. Broccoli is great in soufflé form, steamed form not so much.
6. String beans are great, but toddlers with 6 teef have a hard time consuming them, so they tear, suck, and eat the garlic/butter from each piece.
7. Quinoa is awesome. Anytime.
8. Toddlers love different flavors, so add them! Paprika, curry powder, garlic, thyme, sea salt, cinnamon, nutmeg, cumin, cardamom etc. DO it.

Photo One: Baked paprika/sea salt carrots and cauliflower, baked butternut squash, sweet potato mash, and fruit

Photo Two: Quinoa sweet potato parm burger, butternut squash fries, and fruit

Photo Three: Broccoli souffle, carrot coins, butternut squash, garlic butter string beans, and fruit

Lesson to be learned: don't limit your tiny person's diet...they get it, food is great in many forms. Whole foods are great in all forms.

Now on to the summer and VegFest in 2-days! More on that next week...

Monday, May 18, 2015

Rainbow Spring Rolls and Soy Paper Sushi Rolls ~ Vegan

The husband and I lovelovelove sushi. But, unfortunately, it's a bit of an expensive habit :s We usually order it twice a month, and sometimes eat out - which can add anywhere from $100-$200 to our monthly budget (eesh!). So! We decided to whip up some unique sushi rolls with soy paper, accompanied by delish spring rolls!

Recipe Deets

Sushi
Soy paper (5 sheets)
Romaine (approximately 5-6 leaves)
1/2 avocado
1 Cucumber sliced thin
Butternut squash (approximately 8 baked finger length pieces)
1/2 Red Pepper (sliced thin)
1/4 cup diced strawberries
1 jalapeno pepper (sliced thin)
Wasabi sauce

- First lay your soy paper out on a clean surface
- Chose 3 pieces of paper and add: a drizzle of wasabi sauce width wise, cucumber, red peppers, avocado, and romaine
- Roll them and cut width wise, then top with diced strawberries
- Take the final 2 sheets of soy paper and lay them on a clean surface
- Add: wasabi sauce, cucumber, avocado, butternut squash, jalapeno, and romaine
- Roll width wise, cut, and top with extra jalapeno peps!

Yum. YUM.

Spring Rolls
4 pieces of rice paper
1/2 avocado
Red cabbage
1/2 Red Pepper
1 Carrot (sliced into small sticks)
Sweet chili sauce for dippinsssss!

- Follow this tutorial on how to use and assemble spring rolls with rice paper - because it's a tedious process and one that takes a bit of practice, but once you get it down, you will never pay for over-priced rolls again!
- Assemble your rolls using the ingredients above - slice in half
- Dip the heck outta them rolls and insert in your mouth!

Now sit down, pick out a fine ass movie, and relax!

Tuesday, May 12, 2015

Banana Split Nice-Cream ~ Raw/Vegan

mmm. MMM.

I have been craving banana "ice cream" allllll winter! There's a small, local place that is only open April through October and it serves this amazing ice cream alternative made exclusively of bananas! Due to this obsession of mine, a few years ago my husband bought me the exact machine the restaurant uses, and needless to say it has served our household well ~ birthdays, dessert-for-dinner, breakfasts, and et cetera !

So! Right around the beginning of May (yes, that's when I began this post and then life and *ahem* Game of Thrones, Mad Men, Veep, oh and a full-time job got in the way) the fam visited our favorite little restaurant where we ordered beautifully constructed banana ice cream concoctions made up of varying fruits and *healthy* alternative toppings (e.g., coconut, granola, non-dairy chocolate chips, sunflower seeds) - it was heaven in the mouth, but I wanted more...MORE >:D

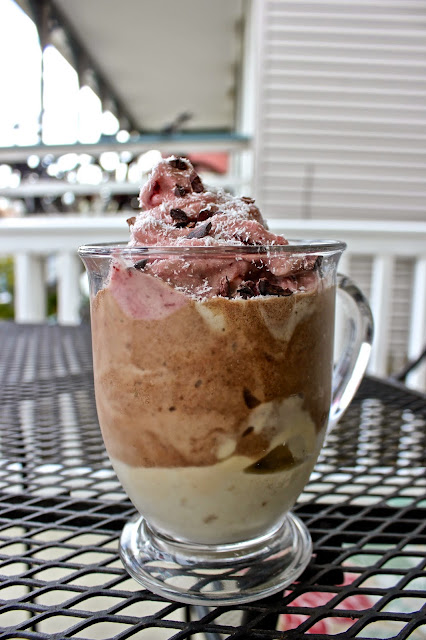
Thus, the very next day I created this:

Recipe Deets (You will need a food processor or homogenizer ~ if you don't have these a blender will work but you will need to add milk, approximately 1/2 cup per banana)

5 frozen bananas (peeled)
1/2 cup frozen cherries
1/2 tbsp raw cacao powder
1 tsp vanilla extract
1/2 tbsp unsweetened coconut (optional)
1/2 tbsp raw cacao nibs (optional)
2 bowls
1 large mug

- in the first bowl process or homogenize 1 1/2 bananas, transfer to a blender and add cacao powder and vanilla ~ blend well and place in freezer
- in the second bowl process or homogenize 1 1/2 bananas then transfer to a blender. Add cherries and blend until it turns a pretty pink (there will be chunks of cherry...this is cool...very cool), place in freezer
- using the mug (which will be your BASE banana portion, see photo above) process or homogenize 2 bananas
- remove cherry and chocolate portions ~ add the chocolate portion to your mug (with the plain banana base already in place), then add the cherry portion on top
- sprinkle with coconut and cacao nibs

Smash in face, dribble some down your chin, wipe your mouth on your sleeve - all without guilt!

Do it.

Monday, April 20, 2015

Overnight Blueberry Chia Seed Pudding ~ Raw/Vegan

This one is super easy, almost zero effort involved, and perfectly amazing on the belly! I'll keep the yapping brief tonight, as it's the end of my 4-day awesome weekend with my husband! We celebrated his 30-something birthday with days packed full-o-fun...so essentially I'm tired and looking to turn my brain off and relax, cocktail in hand of course ha...ha

I'm currently on my 2nd week of RawTill4. I'm beginning to consider making this a lifestyle choice for a few reasons:

1. Even though my husband and I were traveling all over the place Friday and Saturday, I managed to find places to eat that adhered to my new dietary regime.
2. I've never felt less bloated throughout the day as when I am eating clean, uncooked foods
3. I don't calorie count <--- huge deal for me
4. I've slimmed down - this is because of less daytime bloat AND continuing a strict workout regime. Eating healthy is great, but without physical activity and strengthening your body you're looking at a physique that may appear optimum but isn't. Skinny doesn't equal healthy. Strong and toned is what I shoot toward!

Anyway! On to the easiest of RawTill4 recipes yet!

Recipe Deets

1 air tight container (12 ounce or larger)
1 cup unsweetened almond milk (or coconut milk)
1 cup fresh blueberries
3 tbsp chia seeds (protein explosion!!)
1 tsp vanilla extract
dash of cinnamon

- Place all ingredients in mason jar (or airtight container) and refrigerate overnight
- The End

So good. Like hide in a corner so your kids don't see you and ask for you to share...type of good.

Below is a little picy collage of my weekend with the husband...food and all! Now back to reality :s


Monday, April 13, 2015

Morning Wake Up Smoothie Bowl ~ Raw/Vegan

Welly-well, I've just started day 3 of RawTill4 and you know what? It's going super great! Minus the 3pm headache my-body-needs-caffeine moment, but who's keeping track? hrm. ANYWAY. This new (very new) way of eating has actually illuminated a few things for me:

1. Whatever I used to eat was actually slowly building up in my digestive track causing me intense pains due to bloat.
2. I was *always* craving salt, actually, to the point where I thought about it throughout the day.
3. Whether I was eating salads with steamed vegetables or egg whites, I always felt heavy and sluggish.
4. My brain was foggy and tired all of the time.

Over the weekend I made the drastic change to only eat raw fruits, vegetables, nuts, seeds, etc. from the moment I wake up until 4pm. In those 2 days I've lost almost 2 pounds from water weight alone. I wake up feeling light and well rested. And best of all? I'm looking forward to coming up with new, easy recipes that may help me change this "diet" into a lifestyle! As with any life altering decision, it's all about preparation and patience (the latter I'm super not so goods with...bleh).

 Now on to the recipe! Smoothie bowls are a well known, very popular way to smash some nutrients in our faces! They're super easy and you can pretty much take a basic recipe and switch it up a gazillion different ways. So feel free to use the recipe below as a base to take your own smoothie bowl off in to new exciting frontiers!

Recipe Deets
2 cups frozen/fresh fruit - pineapple, strawberries, raspberries, blueberries, mango, etc.
1 banana
1 cup water
1 tbsp raw nut butter (optional)
1 tbsp maca powder (optional)

NOTE: If using fresh fruit, add 3-4 ice cubes

- In a high speed blender or food processor, blend everything until smooth
- Pour in bowl and top with lots of fruit, chia seeds, raw granola, hemp seeds, etc.!

Seriously the highlight of my morning!


Saturday, April 11, 2015

Raw Zucchini Pasta w/Marinara ~ 1st Day RawTill4!

It's time to reset the mental and physical clocks! Winter is over, the weather is starting to creep into the 60s, and I'm ready to break free from some bad habits I've held on to for the past few months!

Bad Habits 101 

1. Bad habits are sneaky - one day they're like "hey, I'm new here, would you mind showing me around?" And before you know it you're their best friend, they can't do anything without you, you've shown them the best of times and without you life just wouldn't be worth living...

2. Bad Habits are rude - they only take take take. They demand this, and want that! Oh I'm sorry are you busy trying to do something beneficial for yourself? Too bad! Bad Habit here needs some YOU time...N.O.W. 

3. Bad Habits like salty snacks all day. Like even at 2 am. As I said, they're rude.

4. Bad Habits make you eat your toddler's snacks in mass amounts because they don't care who else may need them (psst...the toddler).

5. Bad Habits eat dinner, dessert, and second desserts even when full. Why? BECAUSE THEY'RE A BAD HABIT!

6. Bad Habits give you tummy aches because they tell you to consume things that they know will make your insides cry (i.e. stuffs that contain sesame...ugh)

7. Bad Habits are costly and create larger-than-life food budgets

So - how did I make it through the past 3 months without gaining a pound and actually losing a few inches round the ol waist? Lots of gym time, lots of crash diets, lots of skipping meals, lots of poor dietary decisions that I knew wouldn't last.

Well here we are - day one of RawTill4! I'm hoping that eating only raw vegan foods from my waking moments until 4pm will aid me in reseting the internal clock so that my cravings for salt/caffeine/anything that fits in my mouth...will subside. Generally the RawTill4 diet involves eating a million calories during the day and high carb/low fat at night. Lots of bananas, lots of dates, fruits a la all the time, smoothies fo' life, 100 ounces of water, etc etc...well I ain't doing it that way. As with almost anything I set out to do, I tend to change things up to fit my life and what I know about my body. Plus bananas and smoothies all the times sounds boring. And I'm easily bored...

So! Along with regular healthy recipes, I will be including my raw food journey and posting recipes I've come up with as I move along.

Recipe Deets (you will need a spiralizer or some contraption to spiralize the zucchini)

Noodles
- 2-3 medium zucchini
- a bit of sea salt

Marinara 
- 4 roma tomatoes
- 1 shallot (diced)
- 2 cloves garlic (sliced)
- handful of sundried tomatoes
- handful of chopped cilantro
- bit of sea salt

1. Spiral your zucchini and place in colander. Cover with a bit of sea salt and allow to sit while water drains. You may need to press the noodles with paper towels.
2. In a high speed blender add all marinara ingredients and blend until smooth
3. Place noodles in a bowl and top with sauce - feel free to add some cherry tomatoes and basil!


Now go get a coffee at 4pm on the dot like I did, because coffee is awesome and only lame people think they can avoid caffeine allllll day!

Tuesday, April 7, 2015

Quick Rice and Bean Fritters ~ Toddler Friendly

It's Monday, it's 5pm, and you just arrived home to a *very* hungry toddler. She's following you with her slow, exaggerated, not-quite-steady gate and she...wants...food...now. Not in 5 minutes...N.O.W. As her little square head looks up at you, you think "Is this my life for the next few years? Attempting to navigate the insatiable hunger of a very small, but very hungry person? NO!" I refuse to be controlled by two tiny hands yanking on my leg, accompanied by a tiny mouth repeating "ra ra...ra ra...RA RA" (i.e., ma ma) over and over and over. So I lean down and calming say, "Mirabelle, we do not whine in this house" as I quickly give her some empty plastic containers and a couple pots and pans to keep her occupied for 10 minutes...ugh...10 minutes, what can I make in that amount of time??

YES! Leftovers...yet not. Tricky tricky mommy >:D

Recipe Deets
1 cup pre-cooked, leftover rice (I used sprouted brown rice)
1 can refried vegetarian beans
2 tbsp flour of choice
1 eggy (or flax eggy if vegan)
a handful of panko breading (optional)
ANY SEASONING YOU WAAANT! (I used sea salt, thyme, and parsley)
1 tbsp coconut oil for frying

-  In a large bowl combine all ingredients except the oil
- Mold into small patties about the size of your palm (if they don't hold, add more flour)
- Heat oil on medium/high in a large skillet
- Add patties and cook on each side for about 5 minutes until golden brown
- serve with homemade tahini sauce, ketchup, sriracha, anything!

Done and done! Now go get yourself that much deserved cocktail!

Wednesday, March 25, 2015

My Love/Hate Relationship with Spring and Summer


"Polymorphous light eruption (PMLE) — PMLE, which usually appears as an itchy rash on sun-exposed skin, is the second most common sun-related skin problem seen by doctors, after common sunburn. It occurs in an estimated 10% to 15% of the U.S. population, affecting people of all races and ethnic backgrounds. Women are affected by PMLE more often than men, and symptoms typically begin during young adult life. In temperate climates, PMLE is usually rare in the winter, but common during the spring and summer months. In many cases, the PMLE rash returns every spring, immediately after the person begins spending more time outside. As spring turns into summer, repeated sun exposure may cause the person to become less sensitive to sunlight, and the PMLE rash either may disappear totally or gradually become less severe. Although the effects of this desensitization process, called "hardening," usually last through the end of the summer, the PMLE rash often returns at full intensity the following spring." (Mayo Clinic)

Spring is in the air, warmth is around the corner, the tulips are a-bloomin', and everyone is just rearing and ready to get their butts outside for some good, old fashioned bbq-n'! Am I right? Well, sort of. All of that sounds amazing, along with the prospect of spending extra hours outdoors taking long walks in my shore town community with the husband and kiddos, but here is the problem: for me, this time of year is a balancing act. A time where I must train my focus on trying yet again to get through the next 5-6 months without potentially painful sores and rashes on my arms, legs, face, neck, back, stomach...well, you get the idea.

Let me step back. This all began when I was about 19 years old. I was living in a dorm on campus with my sister at the college both she and I attended, when I noticed my forearms started feeling itchy. Naturally, I relieved the sensation by, well, scratching the areas that bothered me. Skip ahead a couple of weeks, and the itchy areas had spread the length of my arms and up onto my neck. The small, red bumps were not only extremely itchy, but painful. I didn't tell anyone what was going on other than my sister. I was embarrassed and wore long sleeves and a scarf everywhere I went even though the weather was uncomfortably warm. Inevitably, this made the rash worse and they slowly turned into small open sores. At this time in my life, I was going through a lot already. I no longer played sports year round, so the freshman 15 slowly turned into the freshmen 20...then 25. I was 150 lbs, out of shape, socially anxious, and overall miserable.

Finally, after a few months of the rash not subsiding, my mother took me to a doctor where he gave me a strong anti-histamine (I had taken over the counter anti-histamines and cremes, but nothing worked) and it helped keep the itching to a minimum so that my arms and neck had the time to heal. This particular doctor also suggested I change laundry detergent, hair product, body wash, etc. to brands that were hypo-allergenic. I also did a bit of research of my own, and discovered that my mother's side of the family seemed to have allergies toward certain forms of metal...thus, I stopped wearing any and all jewelry containing metal. All of these changes have helped keep the worse of the symptoms at bay until the autumn and winter months bring shorter days, with less sunlight, equaling less likelihood of any strong reaction (though I have had issues during the winter months, but they are easily quashed with anti-histamine drugs).

Fast-forward spring 2014. I had gone years without any large flair-ups, other than 1-2 weeks bursts of rashes that I could manage, but for some reason that particular Spring brought on warmer than normal weather, resulting in more time spent outside without a gradual "reintroduction" into the newly lit skies of April, and I was left with extremely painful rashes on my face, neck, and ears. The odd thing about this particular allergy is that it "travels". For example: if I have an allergy attack on my face, I have to be extremely careful not to itch anywhere else on my body, even if the itch is unrelated to the actual allergic reaction. Because if I *do* itch, say, my leg, I will be guaranteed the beginnings of an outbreak in that area due to the high level of histamines working through my body at that time. My sister jokingly calls these movements of my hives: travelers. And it's so true! haha <--- gotta laugh, right?

So! Here I sit today, and while the weather has been seasonably miserable this late March, the days are getting longer and I've noticed hives appearing on the side of my neck. Gah! While it's only a small section, I know that this could change drastically and quickly. Needless to say, I will be taking some anti-histamine medication, along with being extremely careful as to what lotions and skin care products I use, because I am determined to try and make it through the next few months with minimal painful breakouts!

Now back to your regularly scheduled program of yummy foods and me-no-more-whining!

Tuesday, March 24, 2015

Protein Blast! Curried Coconut Quinoa with Black Beans ~ Toddler Approved!

Let's just get this out in the open: this meal was inspired by diaper rash. Not just any ol diaper rash, but the very painful, tears in my daughter's eyes kind of rash that makes diaper changes horrible for both parents and baby. So yea, no good at all! I did a little research and realized that citrus and acidic foods may worsen a rash on a little baby's bottom, and while Mirabelle has no known allergies, she had been consuming mass amounts of strawberries, kiwi, raspberries, and tomatoes. Poor little bean.

So! I immediately came up with a meal using ingredients I already had on hand (minus the avocado) that would be dense in nutrients and low in rash-causing acids!

Recipe Deets
1 cup uncooked  organic quinoa
1 can organic black beans (drained and rinsed)
2 cups organic low sodium vegetable broth (or water)
1/2 diced white onion
2 cloves minced garlic
1 tbsp (or more to taste) curry powder
1 tbsp organic coconut oil

Side Suggestions
baked butternut squash
avocado (lightly salted with pink himalayan  sea salt)

- In a medium sauce pan, bring to a boil vegetable broth (or water), quinoa, and curry powder. Once boiling, reduce heat to low and simmer until broth/water is absorbed (approximately 15 minutes)
- Once quinoa is cooked, remove from heat and set aside
- In a large frying pan, heat coconut oil for 30 seconds on medium heat
- Add onion and fry for a few minutes until soft
- Add black beans and garlic, fry for a couple minutes
- Lastly, add quinoa and stir all ingredients together
- Fry everything for another 5 minutes and feel free to add a bit more coconut oil for moisture

Serve hot for adults and warm for baby mouths! I added baked butternut squash (cut, skin, and cube fresh butternut squash. Drizzle a bit of olive oil on top and bake for 15 minutes in an oven at 450°) and lightly salted avocado. My 1 year old went crazy, and my husband spooned mouthful after mouthful of quinoa directly from the pan because he was "tasting" it ha...ha

Now go enjoy something that's not gonna put a rash on your bottom!


Monday, March 23, 2015

Healthy Choco Peanut Butter Cuppies

These peanut butter cups are super simple and use two ingredients! Because of my ingredient choices, each cup is approximately 4 grams of fat, with less than a gram of sugar. If you make mini-cuppies using a mini-muffin tin, you can cut those estimates in half! Due to the nature of this recipe, mainly because of the nutritional information, it is super important to use the two products I have listed below! You can click on each of the products names for a provided link to their respective websites where you can view exact nutritional information and where you can find the products (both found on Amazon if desperate...and when it comes to chocolate desserts, that is sometimes the case).

Recipe Deets

1 Cup Lily's Dark Chocolate Chips
3 tbsp PB2 (reconstituted) - there is also another brand that can be used: Just Great Stuff (I found this to taste a lot sweeter, and it's more expensive which we all know is lame)

- Use either a regular muffin tin for 6 peanut butter cups or a mini-muffin tin for 8-10 cuppies
- Line the pans with baking cups (I used a fancy tin and didn't have liners, which made it super difficult to remove the peanut butter cups, and resulted in having to place the pan in a hot weather bath...also lame)
- In a small sauce pan, melt the chocolate while stirring constantly (if you need to add a little butter or coconut oil, feel free to do so...though this will add fat)
- once melted, remove from heat and divide chocolate into the prepared tin
- Take your powdered peanut butter and add water. The directions say "1 tbsp of water for every 2 tbsp of powder"...I just slowly add filtered water until I reach the desired level of creaminess. Your peanut butter should be creamy and slightly less thick than regular peanut butter (this makes it easy to add to the chocolate)
- When using the regular muffin tin - add a heaping 1/2 tbsp on top of the chocolate
- Place in the freezer for 30 minutes
- Remove and stuff in face
- Place remainder in the fridge in a sealed container

Voila! Treats for those who love chocolate and peanut butter but work hard on maintaining their waistlines and lady-figures!

Side-note: Both products are vegan and made in certified gluten-free facilities.

Saturday, March 21, 2015

Easy Vegetarian Cranberry Sausage Hand Pies ~ Toddler Friendly!

Preparing meals for my tiny human can be tough with a full-time career, weekly exercise routine, daily errands, and just plain ol being tired! So every once in a while I'd like to make something that takes less than an hour and doesn't involve a million ingredients!
So while I'm not a huge fan of using puff pastry, I must admit it made this recipe super easy peasy and the soft dough is perfect for little toddler gums!

Recipe Deets
1 package Gimme Lean sausage
1 package puff pastry (2 sheets)
1/4 cup cranberry sauce
1 egg (beaten)
handful of chopped scallions
a few pinches of freshly chopped sage (or dried if not available)
a small spoon full of mince garlic (fresh or jar)

Preheat oven to 350
- Combine all ingredients in a bowl
- Roll out pastry sheets
- Divide sausage mixture in half and form in the shape of a log (as long as the puff pastry sheet)
- Place each "log" in the middle of both sheets, then roll the sheet and seal in mixture
- Cut each pastry log into 4 even pieces and place on baking sheet lined with parchment paper
- With a scissor, cut little "slits" in the top (see photos above) and brush some egg or egg white on the top of each piece
- Bake for 20-25 minutes until lightly golden

Serve warm for adults and cooled for sensitive little mouthes

YUMAROO!


Wednesday, March 18, 2015

Vegan, Gluten Free Lentil Loaf

Yep, lentils again and again and again! And who would've thought I disliked lentils not even a month ago? This post is a bit different than my previous listed recipes, as it is taken directly from Veggies By Candlelight, but I really wished to share it because the loaf turned out so well that even my meat eatin', pork roll lovin', mac & cheese all day everyday Step-Daughter LOVES the thang!
So! If you're looking for high-protein, low fat, zero complex carbs, vegan, and gluten free...well, you've arrived! Lucky, huh?

So hop, skip, stroll on over to Veggie By Candlelight and have yourself a vegan "meat"loaf smash-in-face fun time!

Monday, March 9, 2015

Vegan Spiced Apple Lentil Muffins ~ Toddler Friendly

Need an easy protein boost for your little one? That's what I was thinking when I realized that raising a child as a vegetarian seems easy, but because of the lack of animal-based proteins, I may be limiting my daughter's nutrition! Bleh :s

So! I'm not a huge lentil fan, but how can you not like those little legumes when encased within a soft, fluffy muffin? Impossible! My first attempt at the recipe using a gluten free oat flour proved tasty, but far too mooshy...as if all the moisture in the world resided in one muffin. So here it is an updated, non-gluten free version!

Recipe Deets (use organic whenever possible!)

1 cup cooked lentils
1 cup all purpose flour
2 1/2 tsp baking powder (I added more and it helped with the muffin's "form")
pinch of sea salt
cinnamon to taste
1/2 cup unsweetened applesauce
1/2 cup coconut sugar (or any type of sugar)
1/4 cup cocnut oil (or olive oil...adds moisture and flavor)
3 tbsp maple syrup (flavor...so feel free to add less sugar because of the maple syrup)
1 cup shredded apple (1 large apple)
1 flax egg (or reg egg if not vegan)

Preheat oven to 375°

- In one bowl mix wet ingredients, and in another bowl mix dry (other than apple)
- Fold dry into wet
- Add apples
- Distribute evenly in muffin pan
- Bake 20 minutes

The great thing about this recipe is that you can substitute the ingredients in accordance to how much sugar/oil you prefer in your baking.

My tiny lady goes crazy for these things! They are perfect snack sized and packed with protein!


Tuesday, February 24, 2015

Twinkle Twinkle Little Star ~ 1st Birthday Party

In celebration of my daughter's 1st year on this Earth, my husband and I threw her a Twinkle Twinkle Little Star party (most favorite song ever...)! Mirabelle made it through one year completely healthy and right on track developmentally (i.e., physical and mental milestones) - so our family is just super thankful and honestly over-joyed with every little moment in time that we share with this tiny lady, and truly love watching her progress and become more and more the person she will grow into :>

I'm going to keep the yapping brief and let the photos speak for themselves!


While we made most of the decor ourselves (i.e., stars, puffs, and pennants), some of the decor also came from my own childhood birthday parties! The glassware, serving bowls, and random decor came from a few places: our wedding decor (which we collected from various thrift stores), wedding gifts, old vases from my grandfather, mini-porcelin dolls from my husband's grandmother, and the gold dinosaurs were re-used from my babyshower (we had bought a bag of cheapo plastic dinos and painted them).

I made Mirabelle's mini-cake and also the 4 layer cake. The icing was made from scratch, as well as the carrot cake cream cheese cookie sandwiches. This helped keep costs down a lot! Though, admittedly, the cost was a bit more than I initially expected yet it all turned out beautifully so I can't complain!

Food + Tableware + Clothing
GF Macarons (vanilla, chocolate ganache, and pistachio) - Posh Pop Bake Shop
Plates, wooden forks/spoons, and cardboard straws - Shop Sweet Lulu
Bunny-shaped Snacks (cheddar, white cheddar, pretzel mix, snickerdoodle, graham crackers, chocolate chip cookies)  - Annie's Homegrown
Mini-cake stand - Homegoods
Tiny Table & Chairs - KidKraft  (gift from my side of the fam)
Mirabelle's Birthday Outfit - Janie and Jack
Mirabelle's Birthday Shoes - Janie and Jack 
My DressForever 21
My Shoes - John Fluevog (my particular style is no longer available) 

Finally, as a family, our gift was a handmade teepee (my husband picked out the fabric and built the structure, while his mother was the seamstress). A perfect hideaway and future reading spot <3

Now what's next??